📹 CameraViewport#
Overview#
CameraViewport allows you to create multiple camera viewport components within the rendering window for simultaneously displaying real-time rendered views from different cameras. This is very useful for multi-angle observation, sensor data visualization, and other scenarios.
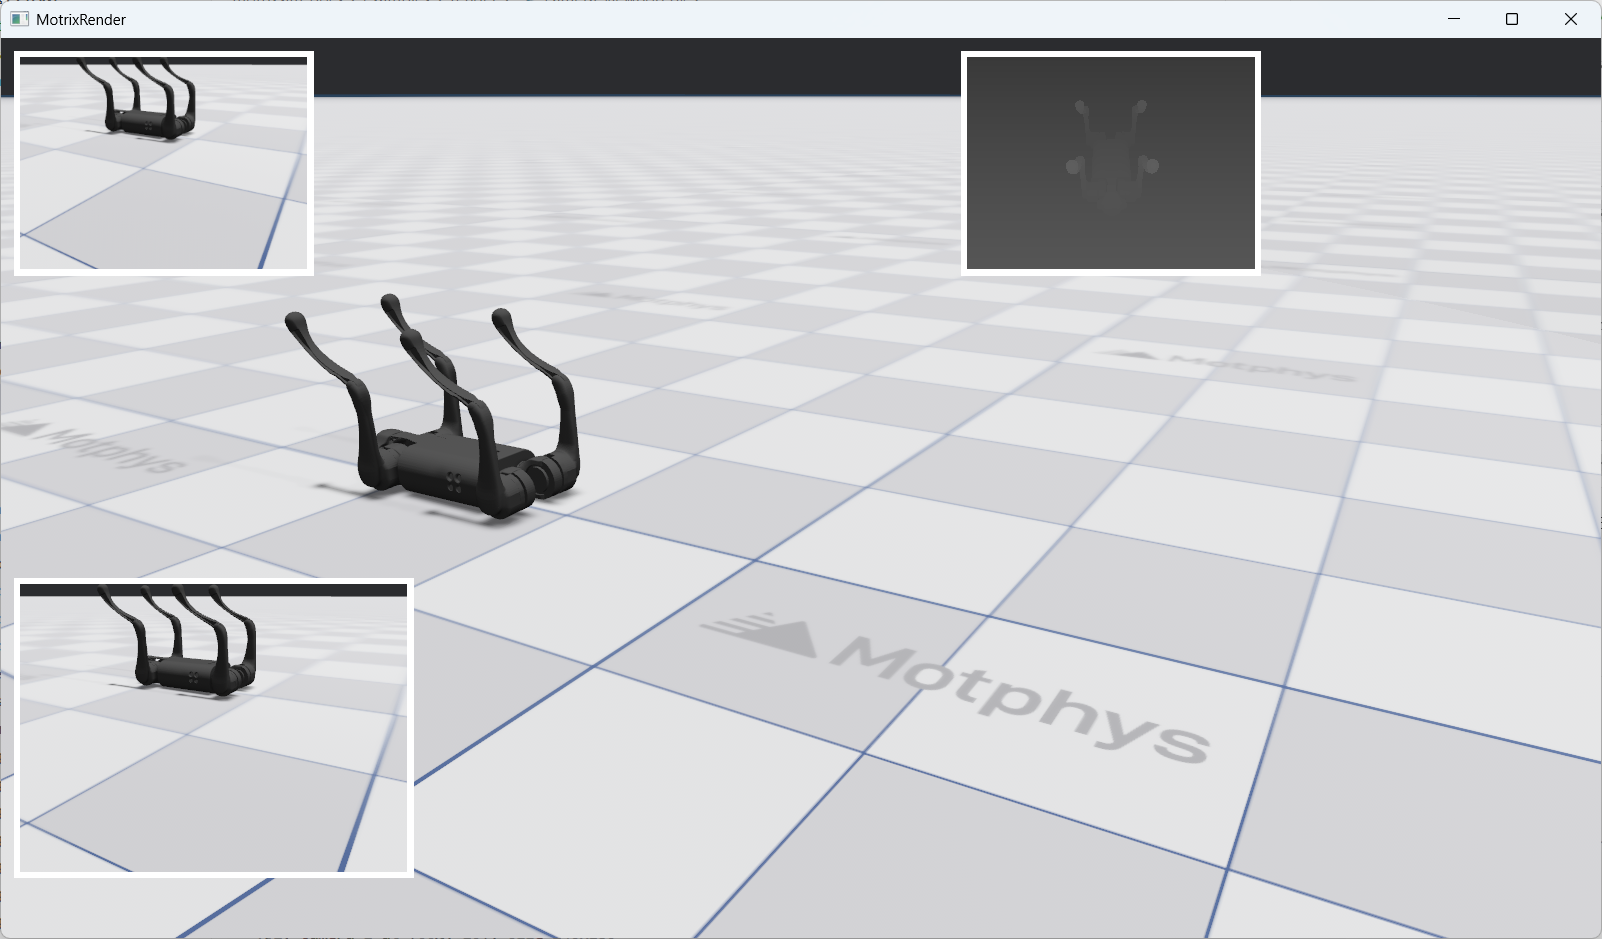
The top-right corner shows the RGBD sensor view displayed using the Camera Viewport Widget component
Key Features#
Multi-viewport Support: Create multiple independent camera viewports in the same window
Flexible Layout: Supports three layout formats: pixels, percentage, and auto
Dynamic Updates: Real-time updates of viewport cameras, layouts, and properties
Basic Creation Method#
Use the render.widgets.create_camera_viewport() method to create a camera viewport widget:
viewport = render.widgets.create_camera_viewport(
    camera=cameras[0],
    layout=Layout(left=10, top=10, width=240, height=180),
    sim_world_index=0
)
Parameter Description:
camera: The camera object to display (required)
layout: Layout configuration (optional, defaults to left=50, top=50, width=200, height=200)
sim_world_index: Simulation world index (optional, defaults to 0)
Return Value: Returns a CameraViewport object.
Creating Multiple Viewports#
You can create multiple viewports in the same window, each displaying a different camera’s view:
# Demonstrates fixed pixel positioning and sizing
vp1 = render.widgets.create_camera_viewport(
    cameras[0], layout=Layout(left=10, top=10, width=240, height=180), sim_world_index=0
)

# Viewport 2: Top-right with percentage-based layout
# Demonstrates responsive positioning using percentages
vp2 = render.widgets.create_camera_viewport(
    cameras[1], layout=Layout(left="60%", top=10, width=240, height=180), sim_world_index=0
)

# Viewport 3: Bottom-left with mixed layout (pixels + percentage)
# Demonstrates mixed layout values
vp3 = render.widgets.create_camera_viewport(
    cameras[0], layout=Layout(left=10, top="60%", width=320, height=240), sim_world_index=0
)
This code creates three viewports:
vp1: Top-left corner, using pixel layout, displaying cameras[0]
vp2: Top-right corner, using percentage layout, displaying cameras[1]
vp3: Bottom-left corner, using mixed layout, displaying cameras[0]
Widget Dynamic Updates#
After creating a widget, you can dynamically update its properties through the update() method.
Updating Viewport Properties#
The CameraViewport.update() method supports the following parameters:
camera: New camera object
layout: New layout configuration
sim_world_index: New simulation world index
All parameters are optional; only provide the parameters that need to be updated.
Updating Camera#
Switch the camera displayed by the viewport:
viewport.update(camera=cameras[1])
Updating Layout#
Modify the position and size of the viewport:
viewport.update(layout=Layout(left=100, top=100, width=300, height=200))
Combined Updates#
You can update multiple properties simultaneously:
viewport.update(
    camera=cameras[2],
    layout=Layout(left=200, top=200),
    sim_world_index=0
)
Interactive Control Examples#
The following example shows how to update widgets through keyboard interactions:
Switching Cameras#
if render.input.is_key_just_pressed("1"):
    vp1.update(camera=cameras[0])
    print("vp1: switched to camera 0")

if render.input.is_key_just_pressed("2"):
    vp1.update(camera=cameras[1])
    print("vp1: switched to camera 1")

if render.input.is_key_just_pressed("3"):
    if len(cameras) >= 3:
        vp1.update(camera=cameras[2])
        print("vp1: switched to camera 2")
    else:
        print("vp1: camera 2 not available")
Press 1/2/3 keys to switch the camera displayed by vp1.
Moving Viewport Position#
move_step = 10
if render.input.is_key_just_pressed("w"):
    vp1_top = max(0, vp1_top - move_step)
    if vp1_visible:
        vp1.update(layout=Layout(left=vp1_left, top=vp1_top, width=vp1_width, height=vp1_height))
    print(f"vp1: moved to ({vp1_left}, {vp1_top})")

if render.input.is_key_just_pressed("s"):
    vp1_top += move_step
    if vp1_visible:
        vp1.update(layout=Layout(left=vp1_left, top=vp1_top, width=vp1_width, height=vp1_height))
    print(f"vp1: moved to ({vp1_left}, {vp1_top})")

if render.input.is_key_just_pressed("a"):
    vp1_left = max(0, vp1_left - move_step)
    if vp1_visible:
        vp1.update(layout=Layout(left=vp1_left, top=vp1_top, width=vp1_width, height=vp1_height))
    print(f"vp1: moved to ({vp1_left}, {vp1_top})")

if render.input.is_key_just_pressed("d"):
    vp1_left += move_step
    if vp1_visible:
        vp1.update(layout=Layout(left=vp1_left, top=vp1_top, width=vp1_width, height=vp1_height))
    print(f"vp1: moved to ({vp1_left}, {vp1_top})")
Press w/a/s/d keys to move the position of vp1.
Resizing Viewport#
resize_step = 20
if render.input.is_key_just_pressed("=") or render.input.is_key_just_pressed("+"):
    vp1_width += resize_step
    vp1_height += resize_step * 3 // 4
    if vp1_visible:
        vp1.update(layout=Layout(left=vp1_left, top=vp1_top, width=vp1_width, height=vp1_height))
    print(f"vp1: resized to {vp1_width}x{vp1_height}")

if render.input.is_key_just_pressed("-") or render.input.is_key_just_pressed("_"):
    vp1_width = max(100, vp1_width - resize_step)
    vp1_height = max(75, vp1_height - resize_step * 3 // 4)
    if vp1_visible:
        vp1.update(layout=Layout(left=vp1_left, top=vp1_top, width=vp1_width, height=vp1_height))
    print(f"vp1: resized to {vp1_width}x{vp1_height}")
Press +/- keys to adjust the size of vp1.
Removing Viewports#
If you no longer need a viewport, you can use the remove() method to completely remove it from the rendering window:
viewport.remove()
Warning
After calling the remove() method, the viewport will be permanently removed. Subsequent calls to the update() method on this viewport object will result in an error. If you need to redisplay it, you must recreate the viewport.
The following example shows how to remove a viewport through keyboard interaction:
if render.input.is_key_just_pressed("k"):
    vp3.remove()
    print("vp3: removed from screen")
Press the k key to remove vp3. After removal, vp3 will completely disappear from the screen and cannot be restored through the update method.
Complete Example#
The following is a complete interactive CameraViewport widget system with creation, update, and interaction control features:
#
# Licensed under the Apache License, Version 2.0 (the "License");
# you may not use this file except in compliance with the License.
# You may obtain a copy of the License at
#
#     http://www.apache.org/licenses/LICENSE-2.0
#
# Unless required by applicable law or agreed to in writing, software
# distributed under the License is distributed on an "AS IS" BASIS,
# WITHOUT WARRANTIES OR CONDITIONS OF ANY KIND, either express or implied.
# See the License for the specific language governing permissions and
# limitations under the License.
# ==============================================================================

"""
Widgets Demo - Camera Viewport Example

This example demonstrates the widgets system with camera viewport widgets.

Features demonstrated:
- Creating multiple camera viewports with different layouts
- Pixel-based, percentage-based, and auto layouts
- Interactive viewport manipulation via keyboard controls
- Real-time widget updates

Controls:
- 1/2/3: Switch vp1 camera (sensor_camera_index)
- w/a/s/d: Move vp1 viewport (pixel-based movement)
- +/-: Resize vp1 viewport
- r: Reset all layouts
- h: Toggle vp1 visibility (move off/on screen)
- Delete: Remove vp3 from screen (requires restart to restore)
"""

from motrixsim import SceneData, load_model, run, step
from motrixsim.render import Layout, RenderApp


def main():
    # Print instructions
    print("=" * 60)
    print("Widgets Demo - Camera Viewport Example")
    print("=" * 60)
    print("\nControls:")
    print("  1/2/3   - Switch vp1 to camera 0/1/2")
    print("  w/a/s/d - Move vp1 viewport (up/left/down/right)")
    print("  +/-     - Resize vp1 viewport (larger/smaller)")
    print("  r       - Reset all layouts to default")
    print("  h       - Toggle vp1 visibility")
    print("  k  - Remove vp3 from screen (requires restart to restore)")
    print("\nLayout Formats:")
    print("  Pixels:     Layout(left=50, top=50, width=200, height=150)")
    print("  Percentage: Layout(left='10%', top='10%', width='30%', height='30%')")
    print("  Auto:       Layout(width='auto', height='auto')")
    print("=" * 60)
    print()

    # Create render app for visualization
    with RenderApp() as render:
        # Load the scene model
        path = "examples/assets/go1/scene.xml"
        model = load_model(path)

        # Configure cameras for rendering
        # The go1 scene has multiple cameras that can be used as sensor cameras
        cameras = model.cameras
        if len(cameras) >= 2:
            # Camera 0: RGB camera
            cameras[0].set_render_target("image", 320, 240)

            # Camera 1: Depth camera
            cameras[1].set_render_target("image", 320, 240)
            cameras[1].depth_only = True
            cameras[1].set_near_far(0.1, 1.0)

        # Launch the renderer
        render.launch(model)

        # Create simulation data
        data = SceneData(model)

        # ====================================================================
        # Create Camera Viewport Widgets
        # ====================================================================

        # Viewport 1: Top-left with pixel-based layout
        # Demonstrates fixed pixel positioning and sizing
        vp1 = render.widgets.create_camera_viewport(
            cameras[0], layout=Layout(left=10, top=10, width=240, height=180), sim_world_index=0
        )

        # Viewport 2: Top-right with percentage-based layout
        # Demonstrates responsive positioning using percentages
        vp2 = render.widgets.create_camera_viewport(
            cameras[1], layout=Layout(left="60%", top=10, width=240, height=180), sim_world_index=0
        )

        # Viewport 3: Bottom-left with mixed layout (pixels + percentage)
        # Demonstrates mixed layout values
        vp3 = render.widgets.create_camera_viewport(
            cameras[0], layout=Layout(left=10, top="60%", width=320, height=240), sim_world_index=0
        )

        # Store initial layouts for reset functionality
        initial_layouts = {
            "vp1": Layout(left=10, top=10, width=240, height=180),
            "vp2": Layout(left="60%", top=10, width=240, height=180),
            "vp3": Layout(left=10, top="60%", width=320, height=240),
        }

        # Track vp1 current position and size for movement controls
        vp1_left, vp1_top = 10, 10
        vp1_width, vp1_height = 240, 180
        vp1_visible = True

        print("Widgets created:")
        print(f"  vp1: camera 0 at ({vp1_left}, {vp1_top}), size {vp1_width}x{vp1_height}")
        print("  vp2: camera 1 at (60%, 10), size 240x180")
        print("  vp3: camera 0 at (10, 60%), size 320x240")
        print()

        # ====================================================================
        # Define simulation and rendering callbacks
        # ====================================================================

        def phys_step():
            """Physics step callback - runs 4 substeps for stability"""
            step(model, data)

        def render_step():
            """Render step callback - handles input and synchronization"""
            nonlocal vp1_left, vp1_top, vp1_width, vp1_height, vp1_visible

            # ====================================================================
            # Interactive Controls
            # ====================================================================

            # Switch vp1 camera
            if render.input.is_key_just_pressed("1"):
                vp1.update(camera=cameras[0])
                print("vp1: switched to camera 0")

            if render.input.is_key_just_pressed("2"):
                vp1.update(camera=cameras[1])
                print("vp1: switched to camera 1")

            if render.input.is_key_just_pressed("3"):
                if len(cameras) >= 3:
                    vp1.update(camera=cameras[2])
                    print("vp1: switched to camera 2")
                else:
                    print("vp1: camera 2 not available")

            # Move vp1 viewport (10 pixels per keypress)
            move_step = 10
            if render.input.is_key_just_pressed("w"):
                vp1_top = max(0, vp1_top - move_step)
                if vp1_visible:
                    vp1.update(layout=Layout(left=vp1_left, top=vp1_top, width=vp1_width, height=vp1_height))
                print(f"vp1: moved to ({vp1_left}, {vp1_top})")

            if render.input.is_key_just_pressed("s"):
                vp1_top += move_step
                if vp1_visible:
                    vp1.update(layout=Layout(left=vp1_left, top=vp1_top, width=vp1_width, height=vp1_height))
                print(f"vp1: moved to ({vp1_left}, {vp1_top})")

            if render.input.is_key_just_pressed("a"):
                vp1_left = max(0, vp1_left - move_step)
                if vp1_visible:
                    vp1.update(layout=Layout(left=vp1_left, top=vp1_top, width=vp1_width, height=vp1_height))
                print(f"vp1: moved to ({vp1_left}, {vp1_top})")

            if render.input.is_key_just_pressed("d"):
                vp1_left += move_step
                if vp1_visible:
                    vp1.update(layout=Layout(left=vp1_left, top=vp1_top, width=vp1_width, height=vp1_height))
                print(f"vp1: moved to ({vp1_left}, {vp1_top})")

            # Resize vp1 viewport (20 pixels per keypress)
            resize_step = 20
            if render.input.is_key_just_pressed("=") or render.input.is_key_just_pressed("+"):
                vp1_width += resize_step
                vp1_height += resize_step * 3 // 4
                if vp1_visible:
                    vp1.update(layout=Layout(left=vp1_left, top=vp1_top, width=vp1_width, height=vp1_height))
                print(f"vp1: resized to {vp1_width}x{vp1_height}")

            if render.input.is_key_just_pressed("-") or render.input.is_key_just_pressed("_"):
                vp1_width = max(100, vp1_width - resize_step)
                vp1_height = max(75, vp1_height - resize_step * 3 // 4)
                if vp1_visible:
                    vp1.update(layout=Layout(left=vp1_left, top=vp1_top, width=vp1_width, height=vp1_height))
                print(f"vp1: resized to {vp1_width}x{vp1_height}")

            # Reset all layouts
            if render.input.is_key_just_pressed("r"):
                vp1.update(layout=initial_layouts["vp1"])
                vp2.update(layout=initial_layouts["vp2"])
                vp3.update(layout=initial_layouts["vp3"])
                vp1_left, vp1_top = 10, 10
                vp1_width, vp1_height = 240, 180
                vp1_visible = True
                print("All layouts reset to default")

            # Toggle vp1 visibility
            if render.input.is_key_just_pressed("h"):
                vp1_visible = not vp1_visible
                if vp1_visible:
                    vp1.update(layout=Layout(left=vp1_left, top=vp1_top, width=vp1_width, height=vp1_height))
                    print(f"vp1: visible at ({vp1_left}, {vp1_top})")
                else:
                    # Move off-screen to hide
                    vp1.update(layout=Layout(left=-500, top=-500, width=vp1_width, height=vp1_height))
                    print("vp1: hidden")

            # Remove vp3 from screen
            if render.input.is_key_just_pressed("k"):
                vp3.remove()
                print("vp3: removed from screen")

            # Sync render with simulation
            render.sync(data)

        # ====================================================================
        # Run the main simulation loop
        # ====================================================================
        run.render_loop(model.options.timestep, 60, phys_step, render_step)