🎨 Renderer#
Launching and Loading#
RenderApp is responsible for basic scene rendering. Typically, you create a RenderApp instance in your code, load a model using load_model, and then call render.launch(model) to load the model into the renderer.
Synchronization#
In motrixsim, the renderer runs in an independent thread, so we need to call render.sync(data) in the Python main thread to achieve bidirectional synchronization between physics simulation data and the renderer. The render.sync method actually executes the following logic:
Sends pose data of all physics objects, user drawing instructions, etc. to the renderer
Retrieves window, UI, and other input events as well as camera rendering data from the renderer
The underlying thread model is as follows:
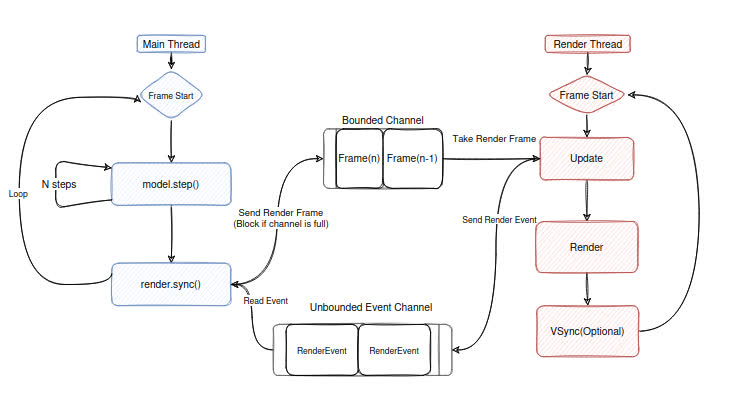
Main thread, i.e., the thread where Python code executes. We typically execute
render.sync(data)once after several physics steps to synchronize data. sync does two things:Accepts input events and camera data from the render thread via the Event pipeline
Sends frame data to the Frame pipeline (blocks and waits if the Frame pipeline is full)
Render thread, responsible for window creation and rendering loop execution. In each loop, it does two things:
Accepts frame data from the main thread via the Frame pipeline and submits it to GPU for rendering (skips if the pipeline is empty)
Processes window, UI, and camera data requests, and sends them to the Event pipeline
Render Settings#
Currently, there is a configuration item RenderSettings for global rendering configuration:
Parameter Name |
Explanation |
Default Value |
|---|---|---|
simplify_render_mesh |
Whether to automatically simplify mesh |
False |
enable_shadow |
Whether to enable light shadows |
True |
enable_ssao |
Whether to enable Screen Space Ambient Occlusion |
True |
enable_oit |
Whether to enable Order-Independent Transparency |
True |
Specifically, the corresponding rendering effects will only take effect when both global configuration is enabled AND certain rendering items are also enabled in the scene description file (mjcf/msd).
Example code see examples/viewer/render_settings.py
Custom UI Components#
Currently supports two types of components: buttons (add_button) and toggles (add_toggle), which respond to user click events by setting callback functions.
Users need to display the left panel through render.opt.set_left_panel_vis(True), and components will be displayed on the panel in the order they are added.
force = 10

# button
def on_click():
    nonlocal force
    print("Button clicked!")
    model.get_actuator("actuator_slider").set_ctrl(data, force)
    force = -force

def on_toggle_changed(value: bool):
    print("toggle value:", value)

render.opt.set_left_panel_vis(True)
render.ui.add_button("Click Me", on_click)
render.ui.add_toggle("Some Toggle", False, on_toggle_changed)
Full code see examples/viewer/custom_ui.py
Gizmos Drawing#
Gizmos are graphical elements used for debugging assistance. The renderer provides a simple API to draw gizmos.
Method Name |
Meaning |
|---|---|
draw_sphere |
Draw wireframe sphere |
draw_cuboid |
Draw wireframe cuboid |
draw_cylinder |
Draw wireframe cylinder |
draw_capsule |
Draw wireframe capsule |
draw_ray |
Draw ray |
draw_line |
Draw line segment |
draw_arrow |
Draw arrow |
draw_rect |
Draw 2D rectangle |
draw_grid |
Draw 3D grid |
draw_axes |
Draw coordinate axes |
set_draw_collider |
Turn on/off collider drawing |
set_draw_joint |
Turn on/off joint drawing |
set_draw_site |
Turn on/off reference point drawing |
set_collider_color |
Set collider drawing color |
set_joint_color |
Set joint drawing color |
set_line_width |
Set drawing line width |
set_joint_size |
Set joint drawing size |
Gizmos use immediate mode, so even if no update is needed, users need to add gizmos during each render synchronization.
nonlocal rot, dir, x
# gizmos is drawning in immediate mode. so you must call it every frame
gizmos = render.gizmos
gizmos.draw_sphere(0.1, np.array([x, 0, 1]), color=Color.rgb(1, 0, 0))

gizmos.draw_cuboid(
    size=np.array([0.2, 0.3, 0.4]), pos=np.array([1, 0, 1]), rot=rot.as_quat(), color=Color.rgb(0, 1, 0)
)

gizmos.draw_cuboid(
    size=np.array([0.1, 0.1, 1]), pos=np.array([3, 0, 1]), rot=rot.as_quat(), color=Color.rgb(0, 1, 0)
)

gizmos.draw_capsule(0.5, 0.5, pos=np.array([1, 1, 1]), rot=Rotation.identity().as_quat())
gizmos.draw_cylinder(0.5, 0.5, pos=np.array([2, 1, 1]), rot=Rotation.identity().as_quat())
gizmos.draw_arrow(start=np.array([3, 1, 1]), end=np.array([4, 2, 1]), color=Color.rgb(1, 1, 0))
gizmos.draw_line(start=np.array([3, 2, 1]), end=np.array([4, 3, 1]), color=Color.rgb(1, 1, 0))
gizmos.draw_ray(start=np.array([4, 1, 1]), vector=np.array([3, 0.2, 0]), color=Color.rgb(1, 1, 0.2))
gizmos.draw_grid(
    pos=np.array([0, -2, 1]),
    rot=rot.as_quat(),
    color=Color.rgb(1, 0.5, 0.2),
)
gizmos.draw_rect(
    pos=np.array([3, -2, 1]),
    rot=Rotation.identity().as_quat(),
    width=1.5,
    height=3.5,
    color=Color.rgb(0.5, 1, 0.2),
)
Full code see examples/viewer/gizmos.py
IO Input Events#
You can get the Input object through render.input. The Input object provides a series of methods for querying the renderer’s mouse, keyboard, and UI events.
You can understand more detailed usage through the following examples:
Valid Keyboard Input List#
The following is the list of supported keyboard key inputs:
Key Type |
Example Keys |
|---|---|
Letter Keys |
|
Function Keys |
|
Special Keys |
|
Arrow Keys |
|
Note: The above are all case-insensitive, and keys not mentioned in the table are not currently supported.
System Camera Control#
The renderer provides a free system camera control system. Users can control the viewing angle and focus point of the system camera through mouse operations (the focus point is always located at the screen center).
Left mouse button press and drag: Rotate the system camera around the focus point
Right mouse button press and drag: Move the focus point (shows red circle as focus point)
Mouse scroll wheel: Zoom (cannot zoom in further when at focus point position)
For more camera control methods, please refer to Camera.
Multi-Instance Rendering of a Single Model#
render.launch(model) also supports two optional parameters: batch:int and render_offset:List[:3]. These are used to set the number of instances and the offset positions when rendering multiple instances of a single model.
# Create the render instance of the model
# Try to create 3 model data
batch = 3
render_offset_1 = [0, 0, 0]
render_offset_2 = [0, 1, 0]
render_offset_3 = [0, -1, 0]
render.launch(
    model,
    batch,
    [
        render_offset_1,
        render_offset_2,
        render_offset_3,
    ],
)
See the complete code at examples/physics/model.py
Instance Visibility#
When we perform single model multi-instance rendering, we can configure the rendering visibility of each instance as needed.
...
# Create multiple instances
render_offsets = []
batch = 10
for i in range(batch):
    render_offsets.append([i * 2.0, 0, 0])
render.launch(model, batch, render_offsets)
data = SceneData(model, batch=(batch,))

target_scene_indices = [1, 3, 5, 7, 9] # Specify instance indices
render.set_scene_vis(target_scene_indices, False) # Hide target instances
render.set_scene_vis(target_scene_indices, True) # Show target instances
It can also be enabled/disabled globally:
render.set_all_scene_vis(False) # Hide all instances
render.set_all_scene_vis(True) # Show all instances
The above operations only affect rendering visibility and do not affect the object’s physics simulation.
Full code see examples/viewer/partial_rendering.py