🎮 Interactive Viewer#
Overview#
The Interactive Viewer provides a simplified interface for quickly visualizing and interacting with physics simulations. The viewer.launch() function operates in a blocking mode, meaning it will not return control to your Python code until the viewer window is closed. This blocking behavior enables precise timing of the physics loop and automatic handling of the simulation.
Unlike the lower-level RenderApp API which requires manual synchronization and loop management, the interactive viewer automatically handles the simulation loop, rendering synchronization, and common UI controls.
When to Use#
The interactive viewer is designed for scenarios where you want to:
Quickly visualize models: Test and inspect physics simulations with minimal code
Interactive debugging: Examine simulation behavior using built-in playback controls
Educational demonstrations: Focus on physics concepts without rendering complexity
Prototype development: Rapidly iterate on model designs and behaviors
Simple applications: When custom rendering logic or non-blocking execution is not required
For production applications requiring fine-grained control over the simulation loop, consider using RenderApp instead.
Key Features#
Blocking execution: Runs until the window is closed, supporting precise physics loop timing
Automatic simulation loop: Physics steps and rendering are handled automatically
Built-in controls: Play/pause, reset, step-through, and speed control out of the box
Multiple invocation modes: Supports empty session, model-only, and model with data
File loading: Drag XML model files directly into the viewer window to load them instantly
Zero configuration: Works with sensible defaults, but customizable when needed
Command-Line Interface#
Installing motrixsim provides the mxview command, an out-of-the-box visualization entry point that requires no Python code (with the virtual environment activated you can run mxview directly; in a uv-managed environment use uv run mxview):
# Launch with a specific model file
uv run mxview path/to/your/model.xml

# Preview a standalone mesh (OBJ/STL)
uv run mxview path/to/convex_parts/part.stl

# Launch empty viewer (drag and drop model files to load)
uv run mxview

# Start playing immediately after launch
uv run mxview path/to/your/model.xml --play
mxview is built on the interactive viewer (viewer.launch()); the physics and render loops are handled internally.
CLI Arguments#
Argument |
Required |
Description |
|---|---|---|
|
No |
Path to a model file or standalone OBJ/STL mesh (positional). If not provided, launches an empty viewer where you can drag and drop models. |
|
No |
Start in the playing (simulation running) state instead of the default paused (editor) state. |
Examples#
# Launch viewer with a specific model
uv run mxview examples/assets/boston_dynamics_spot/scene_arm.xml

# Preview offline convex decomposition output
uv run mxview path/to/convex_parts/link1_convex.obj

# Launch empty viewer for drag-and-drop interaction
uv run mxview
The CLI provides a quick way to visualize models without writing Python code. When a file is provided, it automatically:
Loads the specified model, or wraps a standalone OBJ/STL mesh in a minimal display-only scene
Creates scene data with initial state
Launches the interactive viewer
When launched without arguments, you can simply drag XML model files into the viewer window to load them instantly.
Note
For more control over initial conditions or custom callbacks, use the Python API directly with viewer.launch().
Usage Modes#
The viewer.launch() function supports three distinct invocation patterns to accommodate different use cases:
1. Empty Session (Default Model)#
import motrixsim as mx

# Launch with default demonstration model
mx.viewer.launch()
Launches an interactive visualization session with a default demonstration model. This is the quickest way to explore the viewer functionality.
Tip: You can also drag XML model files directly into the viewer window to load them instantly, making it easy to quickly preview different models without writing code.
2. Model Only#
import motrixsim as mx

# Load your model
model = mx.load_model("path/to/your/model.xml")

# Launch viewer - will create internal SceneData automatically
mx.viewer.launch(model)
Launches a visualization session for the given model. The viewer internally creates its own instance of SceneData for the simulation.
3. Model and Data#
import motrixsim as mx
from motrixsim import SceneData

# Load model and create data
model = mx.load_model("path/to/your/model.xml")
data = SceneData(model)

# Configure initial state
data.qpos[:] = initial_positions
data.qvel[:] = initial_velocities

# Launch viewer with initial data
mx.viewer.launch(model, data)
Uses the provided SceneData instance as the initial state for the simulation. The viewer creates an internal copy of the data for its simulation loop. This mode is useful when you need to:
Set specific initial conditions (positions, velocities, control inputs)
Run stabilization steps before visualization
Start the viewer from a particular simulation state
Pre-Simulation Example#
Run some physics steps before launching the viewer to stabilize the initial state:
# This example uses the Boston Dynamics Spot robot with arm to demonstrate
# the interactive viewer with a model that includes actuators
model = mx.load_model("examples/assets/boston_dynamics_spot/scene_arm.xml")
data = SceneData(model)
for _ in range(20):
    # Physics world step
    step(model, data)
This pre-simulation approach is particularly useful for:
Allowing initial contact forces to settle
Reaching a stable equilibrium configuration
Pre-computing derived quantities before visualization
Complete Example#
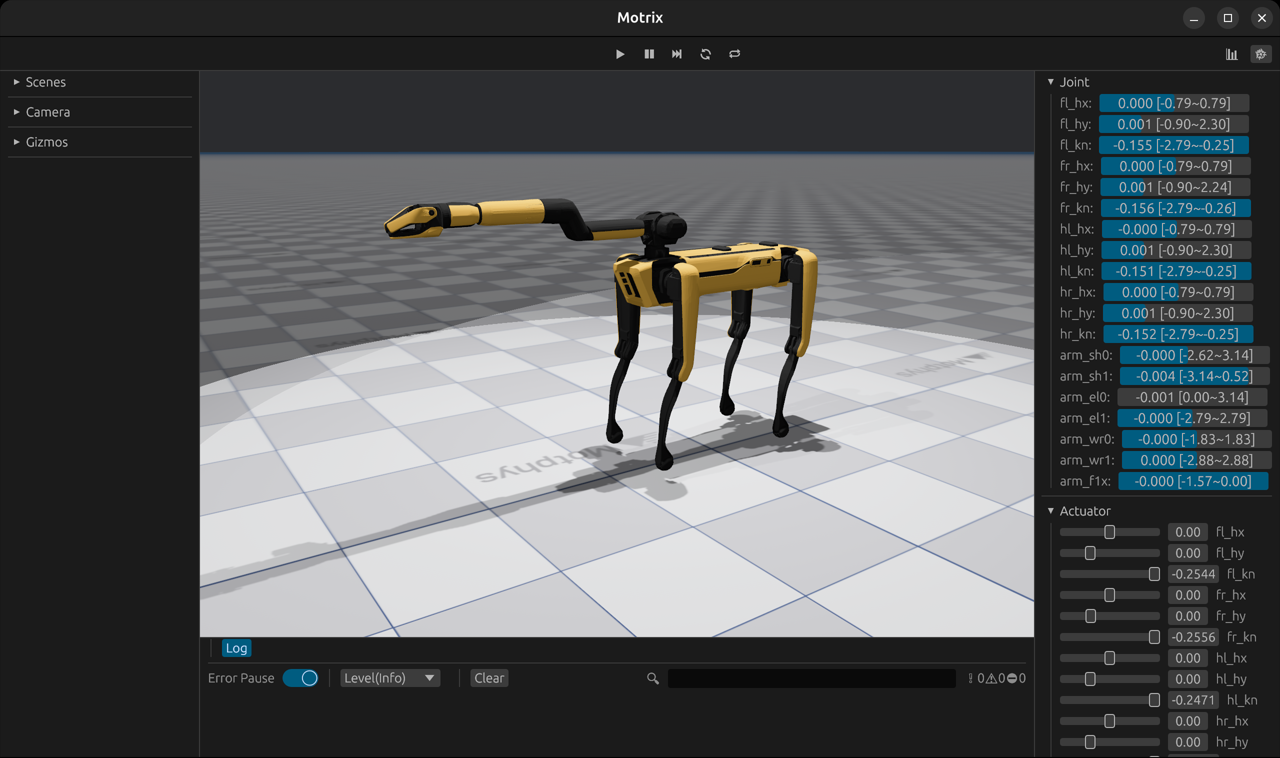
Here’s a complete example demonstrating the interactive viewer with the Boston Dynamics Spot robot:
#
# Licensed under the Apache License, Version 2.0 (the "License");
# you may not use this file except in compliance with the License.
# You may obtain a copy of the License at
#
#     http://www.apache.org/licenses/LICENSE-2.0
#
# Unless required by applicable law or agreed to in writing, software
# distributed under the License is distributed on an "AS IS" BASIS,
# WITHOUT WARRANTIES OR CONDITIONS OF ANY KIND, either express or implied.
# See the License for the specific language governing permissions and
# limitations under the License.
# ==============================================================================

import motrixsim as mx
from motrixsim import SceneData, step, viewer

# Use default model and data
# viewer.launch()

# use custom model
# model = mx.load_model("examples/assets/body.xml")
# viewer.launch(model)

# Use custom model with empty data
# model = mx.load_model("examples/assets/body.xml")
# data = SceneData(model)
# viewer.launch(model, data)

# Use custom model with physics data
# This example uses the Boston Dynamics Spot robot with arm to demonstrate
# the interactive viewer with a model that includes actuators
model = mx.load_model("examples/assets/boston_dynamics_spot/scene_arm.xml")
data = SceneData(model)
for _ in range(20):
    # Physics world step
    step(model, data)

viewer.launch(model, data)
This example:
Loads the Spot robot model with robotic arm (includes actuators)
Creates scene data
Runs 20 physics steps to stabilize the simulation
Launches the interactive viewer
Built-in Controls#
The managed viewer provides several built-in controls accessible through the UI:
Control |
Function |
|---|---|
Play/Pause |
Start or pause the simulation |
Reset |
Reset the simulation to initial state |
Single Step |
Advance simulation by one step (when paused) |
Speed Control |
Adjust simulation speed (slow motion to fast forward) |
Additional mouse controls:
Left mouse drag: Rotate camera around focus point
Right mouse drag: Move focus point
Mouse wheel: Zoom in/out
Tip
Press the spacebar to quickly toggle between play and pause states.
Comparison with RenderApp#
The interactive viewer and RenderApp serve different use cases:
Feature |
Interactive Viewer |
RenderApp |
|---|---|---|
Execution mode |
Blocking (runs until closed) |
Non-blocking (manual control) |
Simulation loop |
Automatic |
Manual ( |
Synchronization |
Automatic |
Manual ( |
Use case |
Quick visualization, prototyping |
Production apps, custom logic |
Control flow |
Viewer controls flow |
You control flow |
Customization |
Limited |
Full control |
When to Use Each#
Use Interactive Viewer when:
Quickly testing or debugging a model
Creating educational demonstrations
Building simple interactive tools
You want minimal code
Use RenderApp when:
Integrating with existing application logic
Need fine-grained control over rendering timing
Building production applications
Implementing custom UI or visualization
Running headless simulations with optional rendering
Best Practices#
Model Loading#
# Good: Absolute or relative paths
model = mx.load_model("examples/assets/boston_dynamics_spot/scene_arm.xml")

# Good: Use pathlib for cross-platform compatibility
from pathlib import Path
model_path = Path(__file__).parent / "assets" / "model.xml"
model = mx.load_model(str(model_path))
Data Initialization#
# Initialize data
data = SceneData(model)

# Set initial configuration
data.qpos[:] = initial_positions
data.qvel[:] = initial_velocities

# Run a few steps to stabilize
for _ in range(10):
    mx.step(model, data)

# Launch viewer
mx.viewer.launch(model, data)
Limitations and Notes#
Warning
The interactive viewer is blocking - your Python code will not continue until the viewer window is closed. If you need concurrent execution, use RenderApp instead.
Other considerations: