🖼️ ImageWidget#
Overview#
ImageWidget allows you to display custom images within the rendering window, which is very useful for visualizing sensor data, displaying debug information, creating custom UIs, and other scenarios.
Key Features#
Custom Image Display: Supports image data in numpy array format
Flexible Layout: Supports three layout formats: pixels, percentage, and auto
Dynamic Updates: Real-time updates of image content and layout properties
Creating Images#
Before using ImageWidget, you need to create an Image object. Use the render.create_image() method to create an image from a numpy array:
import numpy as np

# Create a random RGB image
pixels = np.random.randint(0, 256, (240, 320, 3), dtype=np.uint8)
image = render.create_image(pixels)
Parameter Description:
pixels: numpy array with shape
(height, width, 3)and dtypeuint8Return Value: Returns an
Imageobject
Image Format Requirements:
Color Space: RGB format, each channel value range is 0-255
Data Type: Must be
np.uint8Shape:
(height, width, 3), where 3 represents the RGB three channels
Note
The image shape is (height, width, 3), not (width, height, 3). The first dimension is height (number of rows), and the second dimension is width (number of columns).
Creating ImageWidget#
Use the render.widgets.create_image_widget() method to create an image widget:
widget = render.widgets.create_image_widget(
    image=image,
    layout=Layout(left=10, top=10, width=320, height=240)
)
Parameter Description:
image: Image object (required)
layout: Layout configuration (optional, defaults to left=50, top=50, width=200, height=200)
Return Value: Returns an ImageWidget object.
Creating Multiple ImageWidgets#
You can create multiple ImageWidgets in the same window, each displaying different images:
widget1 = render.widgets.create_image_widget(img1, layout=Layout(left=10, top=10, width=240, height=180))

# Widget 2: Top-right
widget2 = render.widgets.create_image_widget(img2, layout=Layout(left="50%", top=10, width=240, height=180))

# Widget 3: Bottom-left
widget3 = render.widgets.create_image_widget(img3, layout=Layout(left=10, top="50%", width=240, height=180))
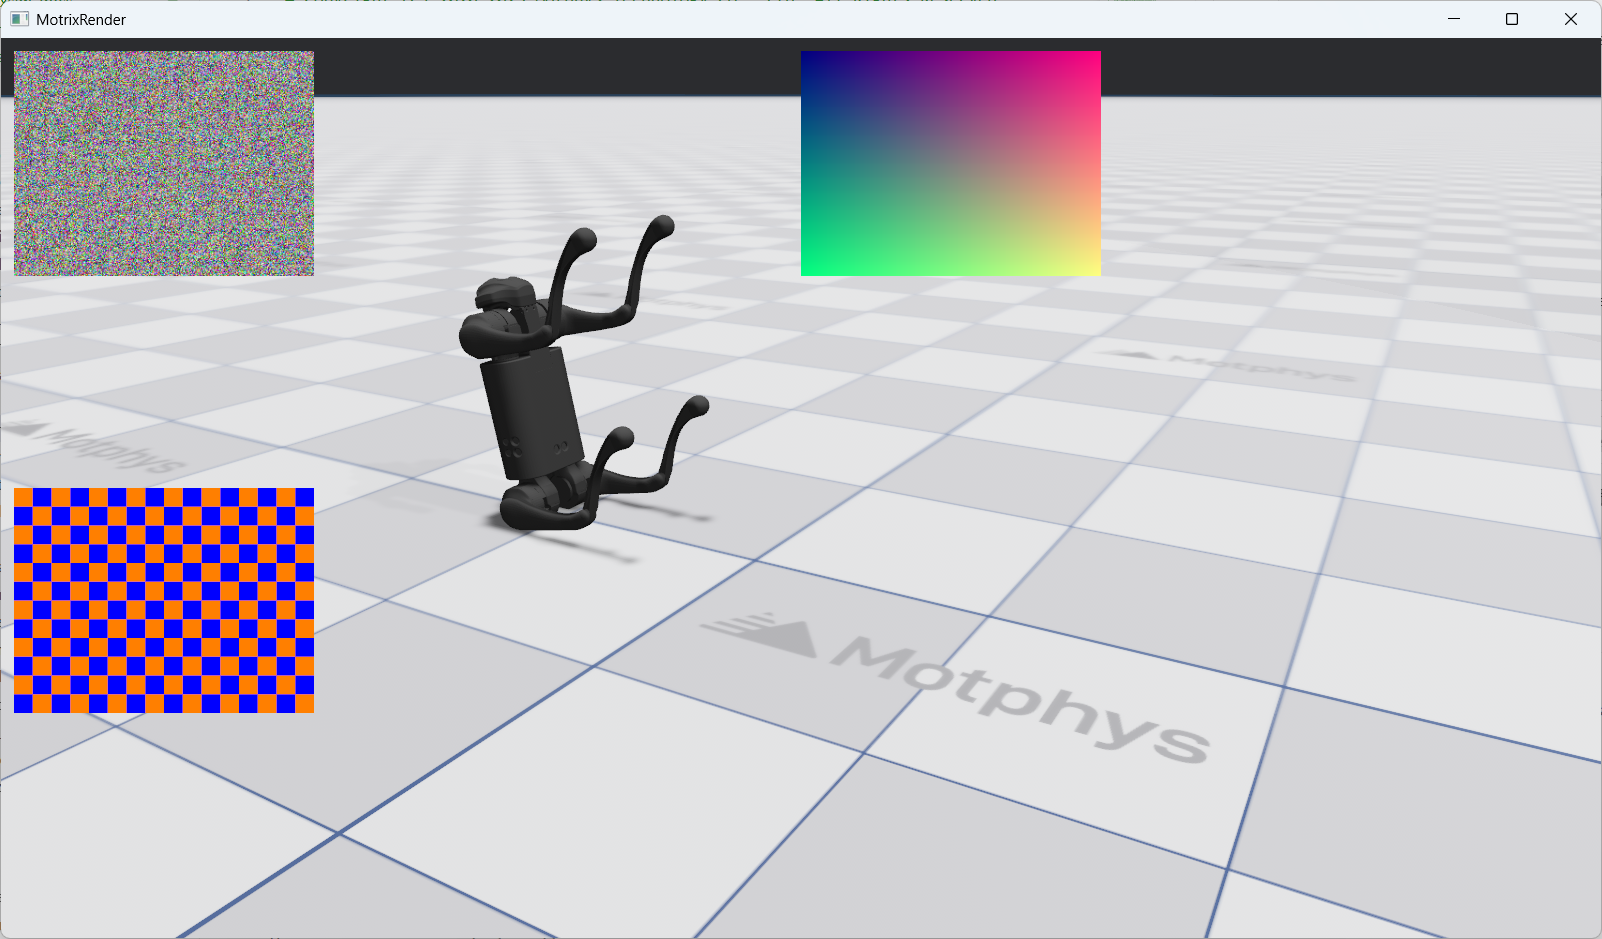
This code creates three ImageWidgets:
widget1: Top-left corner, using pixel layout, displaying random noise image
widget2: Top-right corner, using percentage layout, displaying gradient image
widget3: Bottom-left corner, using mixed layout, displaying checkerboard image
ImageWidget Dynamic Updates#
After creating an ImageWidget, you can dynamically update its displayed content and layout in various ways.
Updating Image Content#
ImageWidget provides two methods to update image content:
Method 1: Directly Update Image’s pixels Property (Recommended)#
This is the most efficient method as it reuses the existing Image object:
# Create new pixel data
new_pixels = np.random.randint(0, 256, (240, 320, 3), dtype=np.uint8)

# Directly update image content
image.pixels = new_pixels
Method 2: Create New Image and Update Widget#
If you need to completely replace the image object:
# Create new image
new_image = render.create_image(new_pixels)

# Update widget to use new image
widget.update(image=new_image)
Note
Method 1 (directly updating pixels) is more efficient as it avoids creating new Image objects. For scenarios that require frequent image content updates (such as real-time sensor data display), it is recommended to use Method 1.
Updating Layout#
Like CameraViewport, you can update ImageWidget’s layout using the update() method:
widget.update(layout=Layout(left=20, top=20, width=400, height=300))
Combined Updates#
You can update both image and layout simultaneously:
widget.update(
    image=new_image,
    layout=Layout(left=50, top=50, width=320, height=240)
)
Interactive Control Examples#
The following example shows how to control ImageWidget through keyboard interactions:
Switching Image Content#
if render.input.is_key_just_pressed("1"):
    pixels = image_creators[0]()
    img1.pixels = pixels
    print("widget1: Changed to random noise")

if render.input.is_key_just_pressed("2"):
    pixels = image_creators[1]()
    img1.pixels = pixels
    print("widget1: Changed to gradient")

if render.input.is_key_just_pressed("3"):
    pixels = image_creators[2]()
    img1.pixels = pixels
    print("widget1: Changed to checkerboard")
Press 1/2/3 keys to switch the image type displayed by widget1 (random noise/gradient/checkerboard).
Moving ImageWidget Position#
move_step = 10
if render.input.is_key_just_pressed("w"):
    widget1_top = max(0, widget1_top - move_step)
    widget1.update(
        layout=Layout(left=widget1_left, top=widget1_top, width=widget1_width, height=widget1_height)
    )
    print(f"widget1: Moved to ({widget1_left}, {widget1_top})")

if render.input.is_key_just_pressed("s"):
    widget1_top += move_step
    widget1.update(
        layout=Layout(left=widget1_left, top=widget1_top, width=widget1_width, height=widget1_height)
    )
    print(f"widget1: Moved to ({widget1_left}, {widget1_top})")

if render.input.is_key_just_pressed("a"):
    widget1_left = max(0, widget1_left - move_step)
    widget1.update(
        layout=Layout(left=widget1_left, top=widget1_top, width=widget1_width, height=widget1_height)
    )
    print(f"widget1: Moved to ({widget1_left}, {widget1_top})")

if render.input.is_key_just_pressed("d"):
    widget1_left += move_step
    widget1.update(
        layout=Layout(left=widget1_left, top=widget1_top, width=widget1_width, height=widget1_height)
    )
    print(f"widget1: Moved to ({widget1_left}, {widget1_top})")
Press w/a/s/d keys to move the position of widget1.
Resizing ImageWidget#
resize_step = 20
if render.input.is_key_just_pressed("=") or render.input.is_key_just_pressed("+"):
    widget1_width += resize_step
    widget1_height += resize_step * 3 // 4
    widget1.update(
        layout=Layout(left=widget1_left, top=widget1_top, width=widget1_width, height=widget1_height)
    )
    print(f"widget1: Resized to {widget1_width}x{widget1_height}")

if render.input.is_key_just_pressed("-") or render.input.is_key_just_pressed("_"):
    widget1_width = max(100, widget1_width - resize_step)
    widget1_height = max(75, widget1_height - resize_step * 3 // 4)
    widget1.update(
        layout=Layout(left=widget1_left, top=widget1_top, width=widget1_width, height=widget1_height)
    )
    print(f"widget1: Resized to {widget1_width}x{widget1_height}")
Press +/- keys to adjust the size of widget1.
Removing ImageWidget#
If you no longer need an ImageWidget, you can use the remove() method to completely remove it from the rendering window:
widget.remove()
Warning
After calling the remove() method, the widget will be permanently removed. Subsequent calls to the update() method on this widget object will result in an error. If you need to redisplay it, you must recreate the widget.
Complete Example#
The following is a complete ImageWidget interaction example showing how to dynamically generate and update images:
#
# Licensed under the Apache License, Version 2.0 (the "License");
# you may not use this file except in compliance with the License.
# You may obtain a copy of the License at
#
#     http://www.apache.org/licenses/LICENSE-2.0
#
# Unless required by applicable law or agreed to in writing, software
# distributed under the License is distributed on an "AS IS" BASIS,
# WITHOUT WARRANTIES OR CONDITIONS OF ANY KIND, either express or implied.
# See the License for the specific language governing permissions and
# limitations under the License.
# ==============================================================================

"""
ImageWidget Demo - Display Random Images

This example demonstrates the ImageWidget system with dynamically generated images.

Features demonstrated:
- Creating images from numpy arrays using render.create_image()
- Displaying multiple image widgets with different layouts
- Updating image content efficiently using the pixels property setter
- Interactive controls for image manipulation

Controls:
- SPACE: Regenerate all images with new random data
- 1/2/3: Switch widget1 to different patterns (random/gradient/checker)
- w/a/s/d: Move widget1 position
- +/-: Resize widget1
- r: Reset all layouts
"""

import numpy as np

from motrixsim import SceneData, load_model, run, step
from motrixsim.render import Layout, RenderApp


def create_random_image(width=320, height=240, seed=None):
    """Create a random RGB image using numpy.

    Args:
        width: Image width in pixels
        height: Image height in pixels
        seed: Optional seed for reproducibility

    Returns:
        numpy array of shape (height, width, 3) with dtype uint8
    """
    if seed is not None:
        np.random.seed(seed)

    # Generate random RGB values
    pixels = np.random.randint(0, 256, (height, width, 3), dtype=np.uint8)
    return pixels


def create_gradient_image(width=320, height=240):
    """Create a gradient image for visual interest.

    Args:
        width: Image width in pixels
        height: Image height in pixels

    Returns:
        numpy array of shape (height, width, 3) with dtype uint8
    """
    # Create coordinate grids
    x = np.linspace(0, 255, width, dtype=np.uint8)
    y = np.linspace(0, 255, height, dtype=np.uint8)

    # Create meshgrid for gradient
    xx, yy = np.meshgrid(x, y)

    # Stack to create RGB
    pixels = np.stack([xx, yy, np.full_like(xx, 128)], axis=2).astype(np.uint8)
    return pixels


def create_checkerboard_image(width=320, height=240, square_size=20):
    """Create a checkerboard pattern image.

    Args:
        width: Image width in pixels
        height: Image height in pixels
        square_size: Size of each checkerboard square

    Returns:
        numpy array of shape (height, width, 3) with dtype uint8
    """
    # Create checkerboard pattern
    squares_y = height // square_size
    squares_x = width // square_size

    checkerboard = np.zeros((squares_y, squares_x), dtype=np.uint8)
    checkerboard[::2, ::2] = 255
    checkerboard[1::2, 1::2] = 255

    # Tile to full image
    pattern = np.kron(checkerboard, np.ones((square_size, square_size), dtype=np.uint8))
    pattern = pattern[:height, :width]

    # Stack to create RGB
    pixels = np.stack([pattern, pattern // 2, 255 - pattern], axis=2).astype(np.uint8)
    return pixels


def main():
    # Print instructions
    print("=" * 60)
    print("ImageWidget Demo - Display Random Images")
    print("=" * 60)
    print("\nControls:")
    print("  SPACE   - Regenerate all images with new random data")
    print("  1/2/3   - Change widget1 pattern (random/gradient/checker)")
    print("  w/a/s/d - Move widget1 position (up/left/down/right)")
    print("  +/-     - Resize widget1")
    print("  r       - Reset all layouts")
    print("\nLayout Formats:")
    print("  Pixels:     Layout(left=50, top=50, width=200, height=150)")
    print("  Percentage: Layout(left='10%', top='10%', width='30%', height='30%')")
    print("=" * 60)
    print()

    # Create render app for visualization
    with RenderApp() as render:
        # Load a simple model (any model will work)
        path = "examples/assets/go1/scene.xml"
        model = load_model(path)

        # Launch the renderer
        render.launch(model)

        # Create simulation data
        data = SceneData(model)

        # ====================================================================
        # Create Images using render.create_image()
        # ====================================================================

        # Image 1: Random noise
        pixels1 = create_random_image(320, 240, seed=42)
        img1 = render.create_image(pixels1)

        # Image 2: Gradient pattern
        pixels2 = create_gradient_image(320, 240)
        img2 = render.create_image(pixels2)

        # Image 3: Checkerboard pattern
        pixels3 = create_checkerboard_image(320, 240)
        img3 = render.create_image(pixels3)

        # Store for regeneration
        image_creators = [
            lambda: create_random_image(320, 240),
            lambda: create_gradient_image(320, 240),
            lambda: create_checkerboard_image(320, 240),
        ]

        print("Images created:")
        print("  img1: Random noise (320x240)")
        print("  img2: Gradient (320x240)")
        print("  img3: Checkerboard (320x240)")
        print()

        # ====================================================================
        # Create Image Widgets
        # ====================================================================

        # Widget 1: Top-left
        widget1 = render.widgets.create_image_widget(img1, layout=Layout(left=10, top=10, width=240, height=180))

        # Widget 2: Top-right
        widget2 = render.widgets.create_image_widget(img2, layout=Layout(left="50%", top=10, width=240, height=180))

        # Widget 3: Bottom-left
        widget3 = render.widgets.create_image_widget(img3, layout=Layout(left=10, top="50%", width=240, height=180))

        # Store initial layouts
        initial_layouts = {
            "widget1": Layout(left=10, top=10, width=240, height=180),
            "widget2": Layout(left="50%", top=10, width=240, height=180),
            "widget3": Layout(left=10, top="50%", width=240, height=180),
        }

        # Track widget1 position
        widget1_left, widget1_top = 10, 10
        widget1_width, widget1_height = 240, 180

        print("Widgets created:")
        print("  widget1: Random noise at (10, 10), size 240x180")
        print("  widget2: Gradient at (50%, 10), size 240x180")
        print("  widget3: Checkerboard at (10, 50%), size 240x180")
        print()

        # ====================================================================
        # Define simulation and rendering callbacks
        # ====================================================================

        def phys_step():
            """Physics step callback"""
            step(model, data)

        def render_step():
            """Render step callback - handles input and synchronization"""
            nonlocal widget1_left, widget1_top, widget1_width, widget1_height

            # ====================================================================
            # Interactive Controls
            # ====================================================================

            # Regenerate all images
            if render.input.is_key_just_pressed("space"):
                print("Regenerating all images...")
                # Update img1 pixels
                pixels = image_creators[0]()
                img1.pixels = pixels

                # Update img2 pixels
                pixels = image_creators[1]()
                img2.pixels = pixels

                # Update img3 pixels
                pixels = image_creators[2]()
                img3.pixels = pixels

                print("All images regenerated")

            # Change widget1 pattern type
            if render.input.is_key_just_pressed("1"):
                pixels = image_creators[0]()
                img1.pixels = pixels
                print("widget1: Changed to random noise")

            if render.input.is_key_just_pressed("2"):
                pixels = image_creators[1]()
                img1.pixels = pixels
                print("widget1: Changed to gradient")

            if render.input.is_key_just_pressed("3"):
                pixels = image_creators[2]()
                img1.pixels = pixels
                print("widget1: Changed to checkerboard")

            # Move widget1 (10 pixels per keypress)
            move_step = 10
            if render.input.is_key_just_pressed("w"):
                widget1_top = max(0, widget1_top - move_step)
                widget1.update(
                    layout=Layout(left=widget1_left, top=widget1_top, width=widget1_width, height=widget1_height)
                )
                print(f"widget1: Moved to ({widget1_left}, {widget1_top})")

            if render.input.is_key_just_pressed("s"):
                widget1_top += move_step
                widget1.update(
                    layout=Layout(left=widget1_left, top=widget1_top, width=widget1_width, height=widget1_height)
                )
                print(f"widget1: Moved to ({widget1_left}, {widget1_top})")

            if render.input.is_key_just_pressed("a"):
                widget1_left = max(0, widget1_left - move_step)
                widget1.update(
                    layout=Layout(left=widget1_left, top=widget1_top, width=widget1_width, height=widget1_height)
                )
                print(f"widget1: Moved to ({widget1_left}, {widget1_top})")

            if render.input.is_key_just_pressed("d"):
                widget1_left += move_step
                widget1.update(
                    layout=Layout(left=widget1_left, top=widget1_top, width=widget1_width, height=widget1_height)
                )
                print(f"widget1: Moved to ({widget1_left}, {widget1_top})")

            # Resize widget1 (20 pixels per keypress)
            resize_step = 20
            if render.input.is_key_just_pressed("=") or render.input.is_key_just_pressed("+"):
                widget1_width += resize_step
                widget1_height += resize_step * 3 // 4
                widget1.update(
                    layout=Layout(left=widget1_left, top=widget1_top, width=widget1_width, height=widget1_height)
                )
                print(f"widget1: Resized to {widget1_width}x{widget1_height}")

            if render.input.is_key_just_pressed("-") or render.input.is_key_just_pressed("_"):
                widget1_width = max(100, widget1_width - resize_step)
                widget1_height = max(75, widget1_height - resize_step * 3 // 4)
                widget1.update(
                    layout=Layout(left=widget1_left, top=widget1_top, width=widget1_width, height=widget1_height)
                )
                print(f"widget1: Resized to {widget1_width}x{widget1_height}")

            # Reset all layouts
            if render.input.is_key_just_pressed("r"):
                widget1.update(layout=initial_layouts["widget1"])
                widget2.update(layout=initial_layouts["widget2"])
                widget3.update(layout=initial_layouts["widget3"])
                widget1_left, widget1_top = 10, 10
                widget1_width, widget1_height = 240, 180
                print("All layouts reset to default")

            # Sync render with simulation
            render.sync(data)

        # ====================================================================
        # Run the main simulation loop
        # ====================================================================
        run.render_loop(model.options.timestep, 60, phys_step, render_step)
ImageWidget Control Instructions:
SPACE: Regenerate all images
1/2/3: Switch widget1 image type (random noise/gradient/checkerboard)
w/a/s/d: Move widget1 position (up/left/down/right)
+/-: Adjust widget1 size
r: Reset all layouts
Performance Optimization Recommendations#
Image Update Frequency:
For real-time sensor data, recommend using
image.pixels = new_pixelsmethodAvoid creating new Image objects in high-frequency loops
Set reasonable update frequency to avoid exceeding rendering frame rate
Image Size Optimization:
Use appropriate image resolution, avoid unnecessarily large images
For small-sized widgets, using smaller images can improve performance
Consider using image pyramids or multi-resolution display
Memory Management:
Reuse Image objects instead of frequently creating new ones
Promptly remove widgets that are no longer needed
Pay attention to numpy array memory management to avoid memory leaks