📹 CameraViewport#
概述#
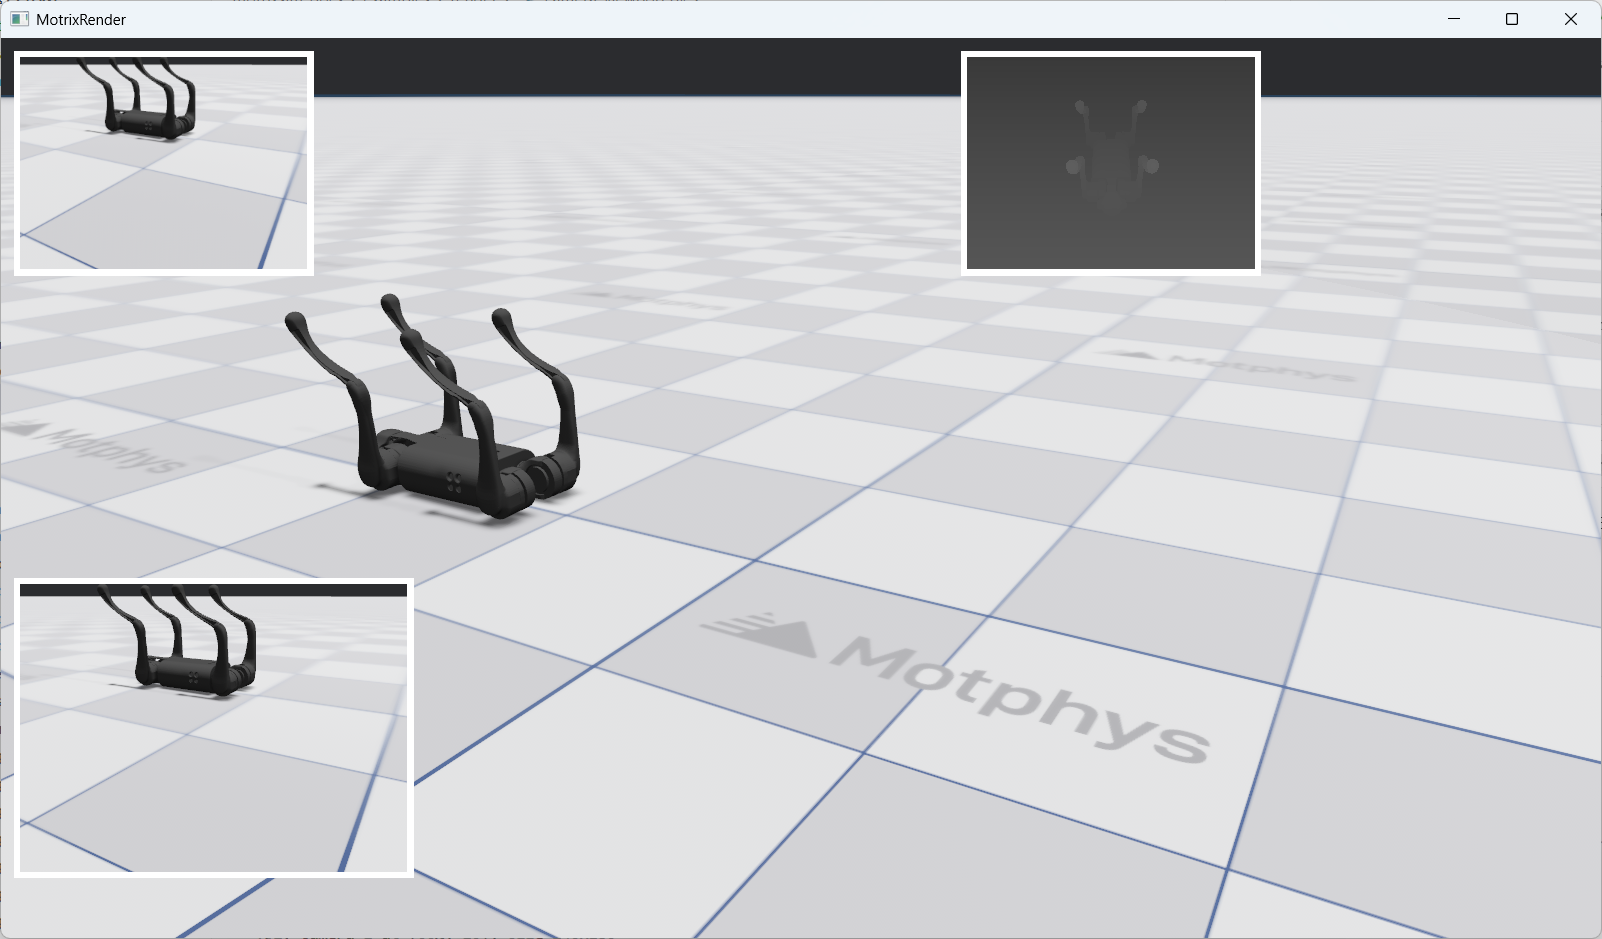
CameraViewport 允许您在渲染窗口中创建多个相机视口组件,用于同时显示不同相机的实时渲染画面。这对于多角度观察、传感器数据可视化等场景非常有用。
右上角展示了使用 Camera Viewport Widget 组件显示的 RGBD 传感器画面
主要特性#
多视口支持: 在同一窗口中创建多个独立的相机视口
灵活布局: 支持像素、百分比和自动三种布局格式
动态更新: 实时更新视口的相机、布局和属性
基础创建方法#
使用 render.widgets.create_camera_viewport() 方法创建相机视口 widget:
viewport = render.widgets.create_camera_viewport(
    camera=cameras[0],
    layout=Layout(left=10, top=10, width=240, height=180),
    sim_world_index=0
)
参数说明:
camera: 要显示的相机对象(必需)
layout: 布局配置(可选,默认为 left=50, top=50, width=200, height=200)
sim_world_index: 模拟世界索引(可选,默认为 0)
返回值:返回一个 CameraViewport 对象。
创建多个 Viewport#
您可以在同一窗口中创建多个 viewport,每个显示不同相机的画面:
# Demonstrates fixed pixel positioning and sizing
vp1 = render.widgets.create_camera_viewport(
    cameras[0], layout=Layout(left=10, top=10, width=240, height=180), sim_world_index=0
)

# Viewport 2: Top-right with percentage-based layout
# Demonstrates responsive positioning using percentages
vp2 = render.widgets.create_camera_viewport(
    cameras[1], layout=Layout(left="60%", top=10, width=240, height=180), sim_world_index=0
)

# Viewport 3: Bottom-left with mixed layout (pixels + percentage)
# Demonstrates mixed layout values
vp3 = render.widgets.create_camera_viewport(
    cameras[0], layout=Layout(left=10, top="60%", width=320, height=240), sim_world_index=0
)
这段代码创建了三个 viewport:
vp1: 左上角,使用像素布局,显示 cameras[0]
vp2: 右上角,使用百分比布局,显示 cameras[1]
vp3: 左下角,使用混合布局,显示 cameras[0]
Widget 动态更新#
创建 widget 后,可以通过 update() 方法动态更新其属性。
更新 Viewport 属性#
CameraViewport.update() 方法支持以下参数:
camera: 新的相机对象
layout: 新的布局配置
sim_world_index: 新的模拟世界索引
所有参数都是可选的,只提供需要更新的参数即可。
更新相机#
切换 viewport 显示的相机:
viewport.update(camera=cameras[1])
更新布局#
修改 viewport 的位置和大小:
viewport.update(layout=Layout(left=100, top=100, width=300, height=200))
组合更新#
可以同时更新多个属性:
viewport.update(
    camera=cameras[2],
    layout=Layout(left=200, top=200),
    sim_world_index=0
)
交互式控制示例#
以下示例展示了如何通过按键交互来更新 widget:
切换相机#
if render.input.is_key_just_pressed("1"):
    vp1.update(camera=cameras[0])
    print("vp1: switched to camera 0")

if render.input.is_key_just_pressed("2"):
    vp1.update(camera=cameras[1])
    print("vp1: switched to camera 1")

if render.input.is_key_just_pressed("3"):
    if len(cameras) >= 3:
        vp1.update(camera=cameras[2])
        print("vp1: switched to camera 2")
    else:
        print("vp1: camera 2 not available")
按 1/2/3 键可以切换 vp1 显示的相机。
移动 Viewport 位置#
move_step = 10
if render.input.is_key_just_pressed("w"):
    vp1_top = max(0, vp1_top - move_step)
    if vp1_visible:
        vp1.update(layout=Layout(left=vp1_left, top=vp1_top, width=vp1_width, height=vp1_height))
    print(f"vp1: moved to ({vp1_left}, {vp1_top})")

if render.input.is_key_just_pressed("s"):
    vp1_top += move_step
    if vp1_visible:
        vp1.update(layout=Layout(left=vp1_left, top=vp1_top, width=vp1_width, height=vp1_height))
    print(f"vp1: moved to ({vp1_left}, {vp1_top})")

if render.input.is_key_just_pressed("a"):
    vp1_left = max(0, vp1_left - move_step)
    if vp1_visible:
        vp1.update(layout=Layout(left=vp1_left, top=vp1_top, width=vp1_width, height=vp1_height))
    print(f"vp1: moved to ({vp1_left}, {vp1_top})")

if render.input.is_key_just_pressed("d"):
    vp1_left += move_step
    if vp1_visible:
        vp1.update(layout=Layout(left=vp1_left, top=vp1_top, width=vp1_width, height=vp1_height))
    print(f"vp1: moved to ({vp1_left}, {vp1_top})")
按 w/a/s/d 键可以移动 vp1 的位置。
调整 Viewport 大小#
resize_step = 20
if render.input.is_key_just_pressed("=") or render.input.is_key_just_pressed("+"):
    vp1_width += resize_step
    vp1_height += resize_step * 3 // 4
    if vp1_visible:
        vp1.update(layout=Layout(left=vp1_left, top=vp1_top, width=vp1_width, height=vp1_height))
    print(f"vp1: resized to {vp1_width}x{vp1_height}")

if render.input.is_key_just_pressed("-") or render.input.is_key_just_pressed("_"):
    vp1_width = max(100, vp1_width - resize_step)
    vp1_height = max(75, vp1_height - resize_step * 3 // 4)
    if vp1_visible:
        vp1.update(layout=Layout(left=vp1_left, top=vp1_top, width=vp1_width, height=vp1_height))
    print(f"vp1: resized to {vp1_width}x{vp1_height}")
按 +/- 键可以调整 vp1 的大小。
移除 Viewport#
如果不再需要某个 viewport,可以使用 remove() 方法将其完全从渲染窗口中移除:
viewport.remove()
警告
调用 remove() 方法后,该 viewport 将被永久移除。后续对该 viewport 对象调用 update() 方法将导致错误。如果需要重新显示,必须重新创建 viewport。
以下示例展示了如何通过按键交互来移除 viewport:
if render.input.is_key_just_pressed("k"):
    vp3.remove()
    print("vp3: removed from screen")
按 k 键可以移除 vp3。移除后,vp3 将从屏幕上完全消失,且无法通过 update 方法恢复。
完整示例#
以下是一个完整的交互式 CameraViewport widget 系统,包含创建、更新、交互控制等功能:
#
# Licensed under the Apache License, Version 2.0 (the "License");
# you may not use this file except in compliance with the License.
# You may obtain a copy of the License at
#
#     http://www.apache.org/licenses/LICENSE-2.0
#
# Unless required by applicable law or agreed to in writing, software
# distributed under the License is distributed on an "AS IS" BASIS,
# WITHOUT WARRANTIES OR CONDITIONS OF ANY KIND, either express or implied.
# See the License for the specific language governing permissions and
# limitations under the License.
# ==============================================================================

"""
Widgets Demo - Camera Viewport Example

This example demonstrates the widgets system with camera viewport widgets.

Features demonstrated:
- Creating multiple camera viewports with different layouts
- Pixel-based, percentage-based, and auto layouts
- Interactive viewport manipulation via keyboard controls
- Real-time widget updates

Controls:
- 1/2/3: Switch vp1 camera (sensor_camera_index)
- w/a/s/d: Move vp1 viewport (pixel-based movement)
- +/-: Resize vp1 viewport
- r: Reset all layouts
- h: Toggle vp1 visibility (move off/on screen)
- Delete: Remove vp3 from screen (requires restart to restore)
"""

from motrixsim import SceneData, load_model, run, step
from motrixsim.render import Layout, RenderApp


def main():
    # Print instructions
    print("=" * 60)
    print("Widgets Demo - Camera Viewport Example")
    print("=" * 60)
    print("\nControls:")
    print("  1/2/3   - Switch vp1 to camera 0/1/2")
    print("  w/a/s/d - Move vp1 viewport (up/left/down/right)")
    print("  +/-     - Resize vp1 viewport (larger/smaller)")
    print("  r       - Reset all layouts to default")
    print("  h       - Toggle vp1 visibility")
    print("  k  - Remove vp3 from screen (requires restart to restore)")
    print("\nLayout Formats:")
    print("  Pixels:     Layout(left=50, top=50, width=200, height=150)")
    print("  Percentage: Layout(left='10%', top='10%', width='30%', height='30%')")
    print("  Auto:       Layout(width='auto', height='auto')")
    print("=" * 60)
    print()

    # Create render app for visualization
    with RenderApp() as render:
        # Load the scene model
        path = "examples/assets/go1/scene.xml"
        model = load_model(path)

        # Configure cameras for rendering
        # The go1 scene has multiple cameras that can be used as sensor cameras
        cameras = model.cameras
        if len(cameras) >= 2:
            # Camera 0: RGB camera
            cameras[0].set_render_target("image", 320, 240)

            # Camera 1: Depth camera
            cameras[1].set_render_target("image", 320, 240)
            cameras[1].depth_only = True
            cameras[1].set_near_far(0.1, 1.0)

        # Launch the renderer
        render.launch(model)

        # Create simulation data
        data = SceneData(model)

        # ====================================================================
        # Create Camera Viewport Widgets
        # ====================================================================

        # Viewport 1: Top-left with pixel-based layout
        # Demonstrates fixed pixel positioning and sizing
        vp1 = render.widgets.create_camera_viewport(
            cameras[0], layout=Layout(left=10, top=10, width=240, height=180), sim_world_index=0
        )

        # Viewport 2: Top-right with percentage-based layout
        # Demonstrates responsive positioning using percentages
        vp2 = render.widgets.create_camera_viewport(
            cameras[1], layout=Layout(left="60%", top=10, width=240, height=180), sim_world_index=0
        )

        # Viewport 3: Bottom-left with mixed layout (pixels + percentage)
        # Demonstrates mixed layout values
        vp3 = render.widgets.create_camera_viewport(
            cameras[0], layout=Layout(left=10, top="60%", width=320, height=240), sim_world_index=0
        )

        # Store initial layouts for reset functionality
        initial_layouts = {
            "vp1": Layout(left=10, top=10, width=240, height=180),
            "vp2": Layout(left="60%", top=10, width=240, height=180),
            "vp3": Layout(left=10, top="60%", width=320, height=240),
        }

        # Track vp1 current position and size for movement controls
        vp1_left, vp1_top = 10, 10
        vp1_width, vp1_height = 240, 180
        vp1_visible = True

        print("Widgets created:")
        print(f"  vp1: camera 0 at ({vp1_left}, {vp1_top}), size {vp1_width}x{vp1_height}")
        print("  vp2: camera 1 at (60%, 10), size 240x180")
        print("  vp3: camera 0 at (10, 60%), size 320x240")
        print()

        # ====================================================================
        # Define simulation and rendering callbacks
        # ====================================================================

        def phys_step():
            """Physics step callback - runs 4 substeps for stability"""
            step(model, data)

        def render_step():
            """Render step callback - handles input and synchronization"""
            nonlocal vp1_left, vp1_top, vp1_width, vp1_height, vp1_visible

            # ====================================================================
            # Interactive Controls
            # ====================================================================

            # Switch vp1 camera
            if render.input.is_key_just_pressed("1"):
                vp1.update(camera=cameras[0])
                print("vp1: switched to camera 0")

            if render.input.is_key_just_pressed("2"):
                vp1.update(camera=cameras[1])
                print("vp1: switched to camera 1")

            if render.input.is_key_just_pressed("3"):
                if len(cameras) >= 3:
                    vp1.update(camera=cameras[2])
                    print("vp1: switched to camera 2")
                else:
                    print("vp1: camera 2 not available")

            # Move vp1 viewport (10 pixels per keypress)
            move_step = 10
            if render.input.is_key_just_pressed("w"):
                vp1_top = max(0, vp1_top - move_step)
                if vp1_visible:
                    vp1.update(layout=Layout(left=vp1_left, top=vp1_top, width=vp1_width, height=vp1_height))
                print(f"vp1: moved to ({vp1_left}, {vp1_top})")

            if render.input.is_key_just_pressed("s"):
                vp1_top += move_step
                if vp1_visible:
                    vp1.update(layout=Layout(left=vp1_left, top=vp1_top, width=vp1_width, height=vp1_height))
                print(f"vp1: moved to ({vp1_left}, {vp1_top})")

            if render.input.is_key_just_pressed("a"):
                vp1_left = max(0, vp1_left - move_step)
                if vp1_visible:
                    vp1.update(layout=Layout(left=vp1_left, top=vp1_top, width=vp1_width, height=vp1_height))
                print(f"vp1: moved to ({vp1_left}, {vp1_top})")

            if render.input.is_key_just_pressed("d"):
                vp1_left += move_step
                if vp1_visible:
                    vp1.update(layout=Layout(left=vp1_left, top=vp1_top, width=vp1_width, height=vp1_height))
                print(f"vp1: moved to ({vp1_left}, {vp1_top})")

            # Resize vp1 viewport (20 pixels per keypress)
            resize_step = 20
            if render.input.is_key_just_pressed("=") or render.input.is_key_just_pressed("+"):
                vp1_width += resize_step
                vp1_height += resize_step * 3 // 4
                if vp1_visible:
                    vp1.update(layout=Layout(left=vp1_left, top=vp1_top, width=vp1_width, height=vp1_height))
                print(f"vp1: resized to {vp1_width}x{vp1_height}")

            if render.input.is_key_just_pressed("-") or render.input.is_key_just_pressed("_"):
                vp1_width = max(100, vp1_width - resize_step)
                vp1_height = max(75, vp1_height - resize_step * 3 // 4)
                if vp1_visible:
                    vp1.update(layout=Layout(left=vp1_left, top=vp1_top, width=vp1_width, height=vp1_height))
                print(f"vp1: resized to {vp1_width}x{vp1_height}")

            # Reset all layouts
            if render.input.is_key_just_pressed("r"):
                vp1.update(layout=initial_layouts["vp1"])
                vp2.update(layout=initial_layouts["vp2"])
                vp3.update(layout=initial_layouts["vp3"])
                vp1_left, vp1_top = 10, 10
                vp1_width, vp1_height = 240, 180
                vp1_visible = True
                print("All layouts reset to default")

            # Toggle vp1 visibility
            if render.input.is_key_just_pressed("h"):
                vp1_visible = not vp1_visible
                if vp1_visible:
                    vp1.update(layout=Layout(left=vp1_left, top=vp1_top, width=vp1_width, height=vp1_height))
                    print(f"vp1: visible at ({vp1_left}, {vp1_top})")
                else:
                    # Move off-screen to hide
                    vp1.update(layout=Layout(left=-500, top=-500, width=vp1_width, height=vp1_height))
                    print("vp1: hidden")

            # Remove vp3 from screen
            if render.input.is_key_just_pressed("k"):
                vp3.remove()
                print("vp3: removed from screen")

            # Sync render with simulation
            render.sync(data)

        # ====================================================================
        # Run the main simulation loop
        # ====================================================================
        run.render_loop(model.options.timestep, 60, phys_step, render_step)