🖼️ ImageWidget#
概述#
ImageWidget 允许您在渲染窗口中显示自定义图像,这对于可视化传感器数据、显示调试信息、创建自定义 UI 等场景非常有用。
主要特性#
自定义图像显示: 支持 numpy 数组格式的图像数据
灵活布局: 支持像素、百分比和自动三种布局格式
动态更新: 实时更新图像内容和布局属性
创建图像#
在使用 ImageWidget 之前,需要先创建一个 Image 对象。使用 render.create_image() 方法从 numpy 数组创建图像:
import numpy as np

# 创建一个随机RGB图像
pixels = np.random.randint(0, 256, (240, 320, 3), dtype=np.uint8)
image = render.create_image(pixels)
参数说明:
pixels: numpy 数组,shape 必须为
(height, width, 3),dtype 为uint8返回值: 返回一个
Image对象
图像格式要求:
颜色空间: RGB 格式,每个通道值范围为 0-255
数据类型: 必须是
np.uint8形状:
(height, width, 3),其中 3 表示 RGB 三个通道
备注
图像的形状是 (height, width, 3),而不是 (width, height, 3)。第一个维度是高度(行数),第二个维度是宽度(列数)。
创建 ImageWidget#
使用 render.widgets.create_image_widget() 方法创建图像 widget:
widget = render.widgets.create_image_widget(
    image=image,
    layout=Layout(left=10, top=10, width=320, height=240)
)
参数说明:
image: Image 对象(必需)
layout: 布局配置(可选,默认为 left=50, top=50, width=200, height=200)
返回值:返回一个 ImageWidget 对象。
创建多个 ImageWidget#
您可以在同一窗口中创建多个 ImageWidget,每个显示不同的图像:
widget1 = render.widgets.create_image_widget(img1, layout=Layout(left=10, top=10, width=240, height=180))

# Widget 2: Top-right
widget2 = render.widgets.create_image_widget(img2, layout=Layout(left="50%", top=10, width=240, height=180))

# Widget 3: Bottom-left
widget3 = render.widgets.create_image_widget(img3, layout=Layout(left=10, top="50%", width=240, height=180))
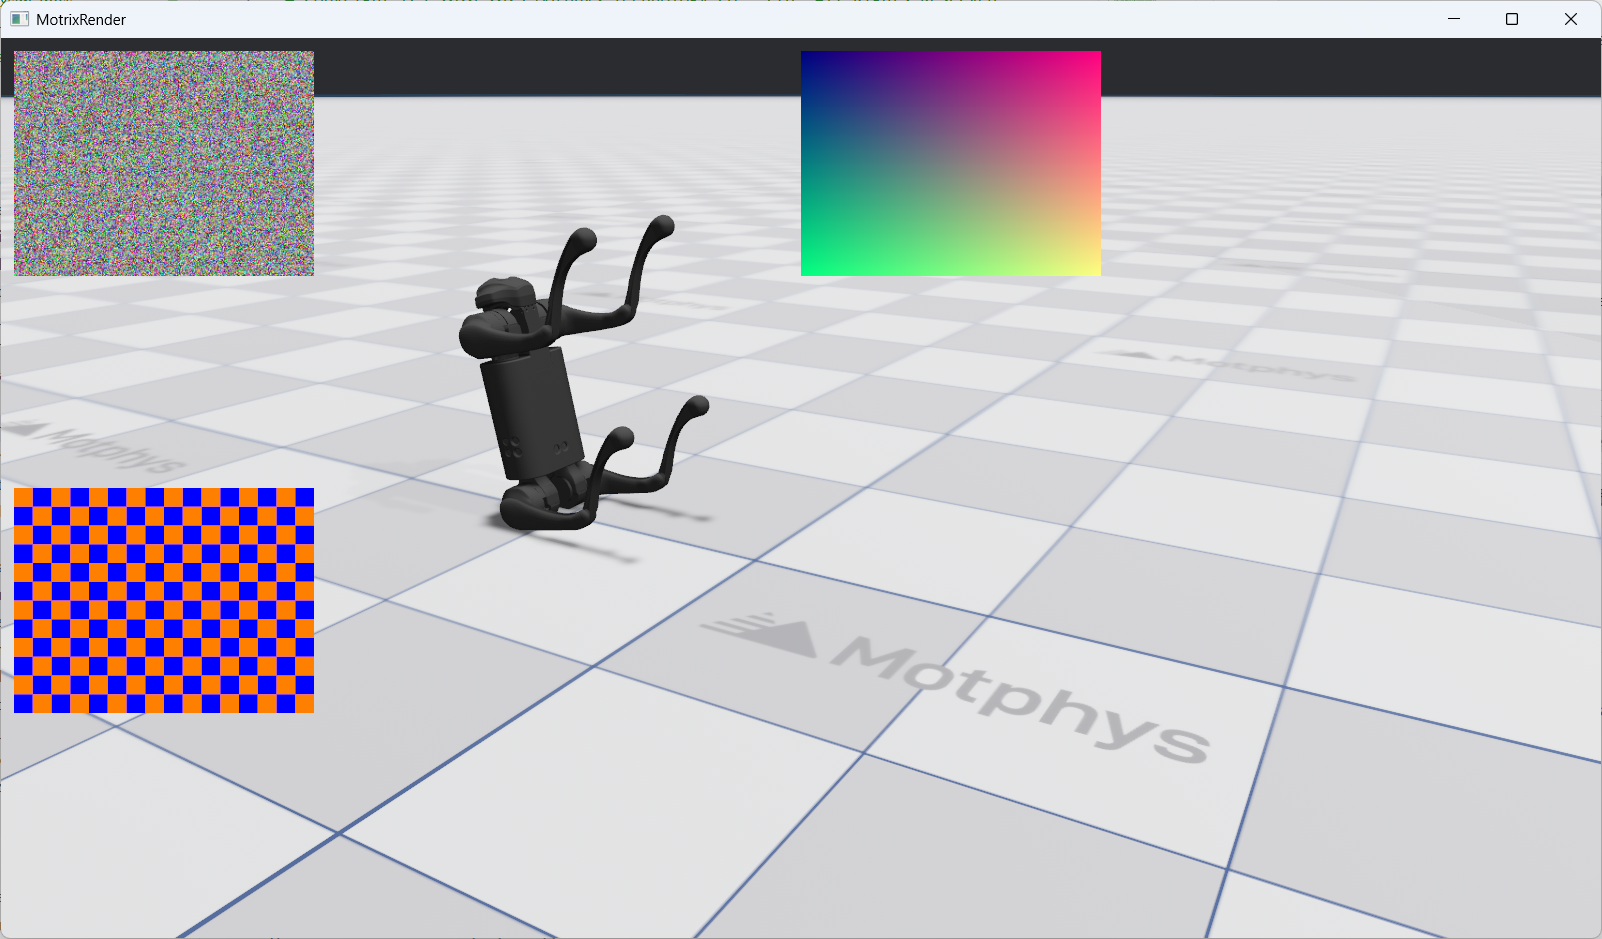
这段代码创建了三个 ImageWidget:
widget1: 左上角,使用像素布局,显示随机噪声图像
widget2: 右上角,使用百分比布局,显示渐变图像
widget3: 左下角,使用混合布局,显示棋盘格图像
ImageWidget 动态更新#
创建 ImageWidget 后,可以通过多种方式动态更新其显示的内容和布局。
更新图像内容#
ImageWidget 提供了两种更新图像内容的方法:
方法 1:直接更新 Image 的 pixels 属性(推荐)#
这是最高效的方法,因为它复用了已有的 Image 对象:
# 创建新的像素数据
new_pixels = np.random.randint(0, 256, (240, 320, 3), dtype=np.uint8)

# 直接更新图像内容
image.pixels = new_pixels
方法 2:创建新 Image 并更新 Widget#
如果需要完全替换图像对象:
# 创建新图像
new_image = render.create_image(new_pixels)

# 更新widget以使用新图像
widget.update(image=new_image)
备注
方法1(直接更新 pixels)更高效,因为它避免了创建新的 Image 对象。在需要频繁更新图像内容的场景(如实时传感器数据显示)中,建议使用方法1。
更新布局#
与 CameraViewport 一样,可以使用 update() 方法更新 ImageWidget 的布局:
widget.update(layout=Layout(left=20, top=20, width=400, height=300))
组合更新#
可以同时更新图像和布局:
widget.update(
    image=new_image,
    layout=Layout(left=50, top=50, width=320, height=240)
)
交互式控制示例#
以下示例展示了如何通过键盘交互来控制 ImageWidget:
切换图像内容#
if render.input.is_key_just_pressed("1"):
    pixels = image_creators[0]()
    img1.pixels = pixels
    print("widget1: Changed to random noise")

if render.input.is_key_just_pressed("2"):
    pixels = image_creators[1]()
    img1.pixels = pixels
    print("widget1: Changed to gradient")

if render.input.is_key_just_pressed("3"):
    pixels = image_creators[2]()
    img1.pixels = pixels
    print("widget1: Changed to checkerboard")
按 1/2/3 键可以切换 widget1 显示的图像类型(随机噪声/渐变/棋盘格)。
移动 ImageWidget 位置#
move_step = 10
if render.input.is_key_just_pressed("w"):
    widget1_top = max(0, widget1_top - move_step)
    widget1.update(
        layout=Layout(left=widget1_left, top=widget1_top, width=widget1_width, height=widget1_height)
    )
    print(f"widget1: Moved to ({widget1_left}, {widget1_top})")

if render.input.is_key_just_pressed("s"):
    widget1_top += move_step
    widget1.update(
        layout=Layout(left=widget1_left, top=widget1_top, width=widget1_width, height=widget1_height)
    )
    print(f"widget1: Moved to ({widget1_left}, {widget1_top})")

if render.input.is_key_just_pressed("a"):
    widget1_left = max(0, widget1_left - move_step)
    widget1.update(
        layout=Layout(left=widget1_left, top=widget1_top, width=widget1_width, height=widget1_height)
    )
    print(f"widget1: Moved to ({widget1_left}, {widget1_top})")

if render.input.is_key_just_pressed("d"):
    widget1_left += move_step
    widget1.update(
        layout=Layout(left=widget1_left, top=widget1_top, width=widget1_width, height=widget1_height)
    )
    print(f"widget1: Moved to ({widget1_left}, {widget1_top})")
按 w/a/s/d 键可以移动 widget1 的位置。
调整 ImageWidget 大小#
resize_step = 20
if render.input.is_key_just_pressed("=") or render.input.is_key_just_pressed("+"):
    widget1_width += resize_step
    widget1_height += resize_step * 3 // 4
    widget1.update(
        layout=Layout(left=widget1_left, top=widget1_top, width=widget1_width, height=widget1_height)
    )
    print(f"widget1: Resized to {widget1_width}x{widget1_height}")

if render.input.is_key_just_pressed("-") or render.input.is_key_just_pressed("_"):
    widget1_width = max(100, widget1_width - resize_step)
    widget1_height = max(75, widget1_height - resize_step * 3 // 4)
    widget1.update(
        layout=Layout(left=widget1_left, top=widget1_top, width=widget1_width, height=widget1_height)
    )
    print(f"widget1: Resized to {widget1_width}x{widget1_height}")
按 +/- 键可以调整 widget1 的大小。
移除 ImageWidget#
如果不再需要某个 ImageWidget,可以使用 remove() 方法将其完全从渲染窗口中移除:
widget.remove()
警告
调用 remove() 方法后,该 widget 将被永久移除。后续对该 widget 对象调用 update() 方法将导致错误。如果需要重新显示,必须重新创建 widget。
完整示例#
以下是一个完整的 ImageWidget 交互示例,展示如何动态生成和更新图像:
#
# Licensed under the Apache License, Version 2.0 (the "License");
# you may not use this file except in compliance with the License.
# You may obtain a copy of the License at
#
#     http://www.apache.org/licenses/LICENSE-2.0
#
# Unless required by applicable law or agreed to in writing, software
# distributed under the License is distributed on an "AS IS" BASIS,
# WITHOUT WARRANTIES OR CONDITIONS OF ANY KIND, either express or implied.
# See the License for the specific language governing permissions and
# limitations under the License.
# ==============================================================================

"""
ImageWidget Demo - Display Random Images

This example demonstrates the ImageWidget system with dynamically generated images.

Features demonstrated:
- Creating images from numpy arrays using render.create_image()
- Displaying multiple image widgets with different layouts
- Updating image content efficiently using the pixels property setter
- Interactive controls for image manipulation

Controls:
- SPACE: Regenerate all images with new random data
- 1/2/3: Switch widget1 to different patterns (random/gradient/checker)
- w/a/s/d: Move widget1 position
- +/-: Resize widget1
- r: Reset all layouts
"""

import numpy as np

from motrixsim import SceneData, load_model, run, step
from motrixsim.render import Layout, RenderApp


def create_random_image(width=320, height=240, seed=None):
    """Create a random RGB image using numpy.

    Args:
        width: Image width in pixels
        height: Image height in pixels
        seed: Optional seed for reproducibility

    Returns:
        numpy array of shape (height, width, 3) with dtype uint8
    """
    if seed is not None:
        np.random.seed(seed)

    # Generate random RGB values
    pixels = np.random.randint(0, 256, (height, width, 3), dtype=np.uint8)
    return pixels


def create_gradient_image(width=320, height=240):
    """Create a gradient image for visual interest.

    Args:
        width: Image width in pixels
        height: Image height in pixels

    Returns:
        numpy array of shape (height, width, 3) with dtype uint8
    """
    # Create coordinate grids
    x = np.linspace(0, 255, width, dtype=np.uint8)
    y = np.linspace(0, 255, height, dtype=np.uint8)

    # Create meshgrid for gradient
    xx, yy = np.meshgrid(x, y)

    # Stack to create RGB
    pixels = np.stack([xx, yy, np.full_like(xx, 128)], axis=2).astype(np.uint8)
    return pixels


def create_checkerboard_image(width=320, height=240, square_size=20):
    """Create a checkerboard pattern image.

    Args:
        width: Image width in pixels
        height: Image height in pixels
        square_size: Size of each checkerboard square

    Returns:
        numpy array of shape (height, width, 3) with dtype uint8
    """
    # Create checkerboard pattern
    squares_y = height // square_size
    squares_x = width // square_size

    checkerboard = np.zeros((squares_y, squares_x), dtype=np.uint8)
    checkerboard[::2, ::2] = 255
    checkerboard[1::2, 1::2] = 255

    # Tile to full image
    pattern = np.kron(checkerboard, np.ones((square_size, square_size), dtype=np.uint8))
    pattern = pattern[:height, :width]

    # Stack to create RGB
    pixels = np.stack([pattern, pattern // 2, 255 - pattern], axis=2).astype(np.uint8)
    return pixels


def main():
    # Print instructions
    print("=" * 60)
    print("ImageWidget Demo - Display Random Images")
    print("=" * 60)
    print("\nControls:")
    print("  SPACE   - Regenerate all images with new random data")
    print("  1/2/3   - Change widget1 pattern (random/gradient/checker)")
    print("  w/a/s/d - Move widget1 position (up/left/down/right)")
    print("  +/-     - Resize widget1")
    print("  r       - Reset all layouts")
    print("\nLayout Formats:")
    print("  Pixels:     Layout(left=50, top=50, width=200, height=150)")
    print("  Percentage: Layout(left='10%', top='10%', width='30%', height='30%')")
    print("=" * 60)
    print()

    # Create render app for visualization
    with RenderApp() as render:
        # Load a simple model (any model will work)
        path = "examples/assets/go1/scene.xml"
        model = load_model(path)

        # Launch the renderer
        render.launch(model)

        # Create simulation data
        data = SceneData(model)

        # ====================================================================
        # Create Images using render.create_image()
        # ====================================================================

        # Image 1: Random noise
        pixels1 = create_random_image(320, 240, seed=42)
        img1 = render.create_image(pixels1)

        # Image 2: Gradient pattern
        pixels2 = create_gradient_image(320, 240)
        img2 = render.create_image(pixels2)

        # Image 3: Checkerboard pattern
        pixels3 = create_checkerboard_image(320, 240)
        img3 = render.create_image(pixels3)

        # Store for regeneration
        image_creators = [
            lambda: create_random_image(320, 240),
            lambda: create_gradient_image(320, 240),
            lambda: create_checkerboard_image(320, 240),
        ]

        print("Images created:")
        print("  img1: Random noise (320x240)")
        print("  img2: Gradient (320x240)")
        print("  img3: Checkerboard (320x240)")
        print()

        # ====================================================================
        # Create Image Widgets
        # ====================================================================

        # Widget 1: Top-left
        widget1 = render.widgets.create_image_widget(img1, layout=Layout(left=10, top=10, width=240, height=180))

        # Widget 2: Top-right
        widget2 = render.widgets.create_image_widget(img2, layout=Layout(left="50%", top=10, width=240, height=180))

        # Widget 3: Bottom-left
        widget3 = render.widgets.create_image_widget(img3, layout=Layout(left=10, top="50%", width=240, height=180))

        # Store initial layouts
        initial_layouts = {
            "widget1": Layout(left=10, top=10, width=240, height=180),
            "widget2": Layout(left="50%", top=10, width=240, height=180),
            "widget3": Layout(left=10, top="50%", width=240, height=180),
        }

        # Track widget1 position
        widget1_left, widget1_top = 10, 10
        widget1_width, widget1_height = 240, 180

        print("Widgets created:")
        print("  widget1: Random noise at (10, 10), size 240x180")
        print("  widget2: Gradient at (50%, 10), size 240x180")
        print("  widget3: Checkerboard at (10, 50%), size 240x180")
        print()

        # ====================================================================
        # Define simulation and rendering callbacks
        # ====================================================================

        def phys_step():
            """Physics step callback"""
            step(model, data)

        def render_step():
            """Render step callback - handles input and synchronization"""
            nonlocal widget1_left, widget1_top, widget1_width, widget1_height

            # ====================================================================
            # Interactive Controls
            # ====================================================================

            # Regenerate all images
            if render.input.is_key_just_pressed("space"):
                print("Regenerating all images...")
                # Update img1 pixels
                pixels = image_creators[0]()
                img1.pixels = pixels

                # Update img2 pixels
                pixels = image_creators[1]()
                img2.pixels = pixels

                # Update img3 pixels
                pixels = image_creators[2]()
                img3.pixels = pixels

                print("All images regenerated")

            # Change widget1 pattern type
            if render.input.is_key_just_pressed("1"):
                pixels = image_creators[0]()
                img1.pixels = pixels
                print("widget1: Changed to random noise")

            if render.input.is_key_just_pressed("2"):
                pixels = image_creators[1]()
                img1.pixels = pixels
                print("widget1: Changed to gradient")

            if render.input.is_key_just_pressed("3"):
                pixels = image_creators[2]()
                img1.pixels = pixels
                print("widget1: Changed to checkerboard")

            # Move widget1 (10 pixels per keypress)
            move_step = 10
            if render.input.is_key_just_pressed("w"):
                widget1_top = max(0, widget1_top - move_step)
                widget1.update(
                    layout=Layout(left=widget1_left, top=widget1_top, width=widget1_width, height=widget1_height)
                )
                print(f"widget1: Moved to ({widget1_left}, {widget1_top})")

            if render.input.is_key_just_pressed("s"):
                widget1_top += move_step
                widget1.update(
                    layout=Layout(left=widget1_left, top=widget1_top, width=widget1_width, height=widget1_height)
                )
                print(f"widget1: Moved to ({widget1_left}, {widget1_top})")

            if render.input.is_key_just_pressed("a"):
                widget1_left = max(0, widget1_left - move_step)
                widget1.update(
                    layout=Layout(left=widget1_left, top=widget1_top, width=widget1_width, height=widget1_height)
                )
                print(f"widget1: Moved to ({widget1_left}, {widget1_top})")

            if render.input.is_key_just_pressed("d"):
                widget1_left += move_step
                widget1.update(
                    layout=Layout(left=widget1_left, top=widget1_top, width=widget1_width, height=widget1_height)
                )
                print(f"widget1: Moved to ({widget1_left}, {widget1_top})")

            # Resize widget1 (20 pixels per keypress)
            resize_step = 20
            if render.input.is_key_just_pressed("=") or render.input.is_key_just_pressed("+"):
                widget1_width += resize_step
                widget1_height += resize_step * 3 // 4
                widget1.update(
                    layout=Layout(left=widget1_left, top=widget1_top, width=widget1_width, height=widget1_height)
                )
                print(f"widget1: Resized to {widget1_width}x{widget1_height}")

            if render.input.is_key_just_pressed("-") or render.input.is_key_just_pressed("_"):
                widget1_width = max(100, widget1_width - resize_step)
                widget1_height = max(75, widget1_height - resize_step * 3 // 4)
                widget1.update(
                    layout=Layout(left=widget1_left, top=widget1_top, width=widget1_width, height=widget1_height)
                )
                print(f"widget1: Resized to {widget1_width}x{widget1_height}")

            # Reset all layouts
            if render.input.is_key_just_pressed("r"):
                widget1.update(layout=initial_layouts["widget1"])
                widget2.update(layout=initial_layouts["widget2"])
                widget3.update(layout=initial_layouts["widget3"])
                widget1_left, widget1_top = 10, 10
                widget1_width, widget1_height = 240, 180
                print("All layouts reset to default")

            # Sync render with simulation
            render.sync(data)

        # ====================================================================
        # Run the main simulation loop
        # ====================================================================
        run.render_loop(model.options.timestep, 60, phys_step, render_step)
ImageWidget 控制说明:
SPACE: 重新生成所有图像
1/2/3: 切换 widget1 的图像类型(随机噪声/渐变/棋盘格)
w/a/s/d: 移动 widget1 位置(上/左/下/右)
+/-: 调整 widget1 大小
r: 重置所有布局
性能优化建议#
图像更新频率:
对于实时传感器数据,建议使用
image.pixels = new_pixels方法避免在高频循环中创建新的 Image 对象
合理设置更新频率,避免超过渲染帧率
图像尺寸优化:
使用合适的图像分辨率,避免不必要的过大的图像
对于小尺寸 widget,使用较小的图像可以提高性能
考虑使用图像金字塔或多分辨率显示
内存管理:
复用 Image 对象,而不是频繁创建新的
及时移除不再需要的 widget
注意 numpy 数组的内存管理,避免内存泄漏